
So, you’ve decided you want to go racing? First off, congratulations! While racing can be intimidating at first, it is the single most rewarding thing I have ever experienced, and I’m excited to get to share that with you. Before you can grid up and feel the adrenaline of your first start, you’ll need to equip yourself with a trusty mechanical steed that is up to the task of getting you on the podium. I built my first race bike mid-2019 in order to catch the second half of the WMRRA race season. Being that I couldn’t find a good guide when I was building my bike, I thought I would offer my thoughts and insight in order to help other new racers like me. Let’s get into it!
Step 1: Decide on a bike type
There are a lot of things to consider when choosing what bike you want to race. Let’s first start with getting ourselves familiar with what a “race bike” means.
What makes a race bike different than a street bike?
Chances are you’ve seen a race bike or two at the track, and noticed how visually different they are from your painter’s taped street bike. Unlike untimed track days, racing has much stricter requirements when it comes to machinery. Race organizations have these requirements so that you and your fellow racers are as safe as possible on the track. There are also some requirements to prevent your bike from causing track stoppage time. Things like oil spills can take hours to clean up, which is the last thing anyone wants to do on a race day.
Here we have a street legal 2020 Yamaha R6 and an HSBK SuperStock R6 of the same year.
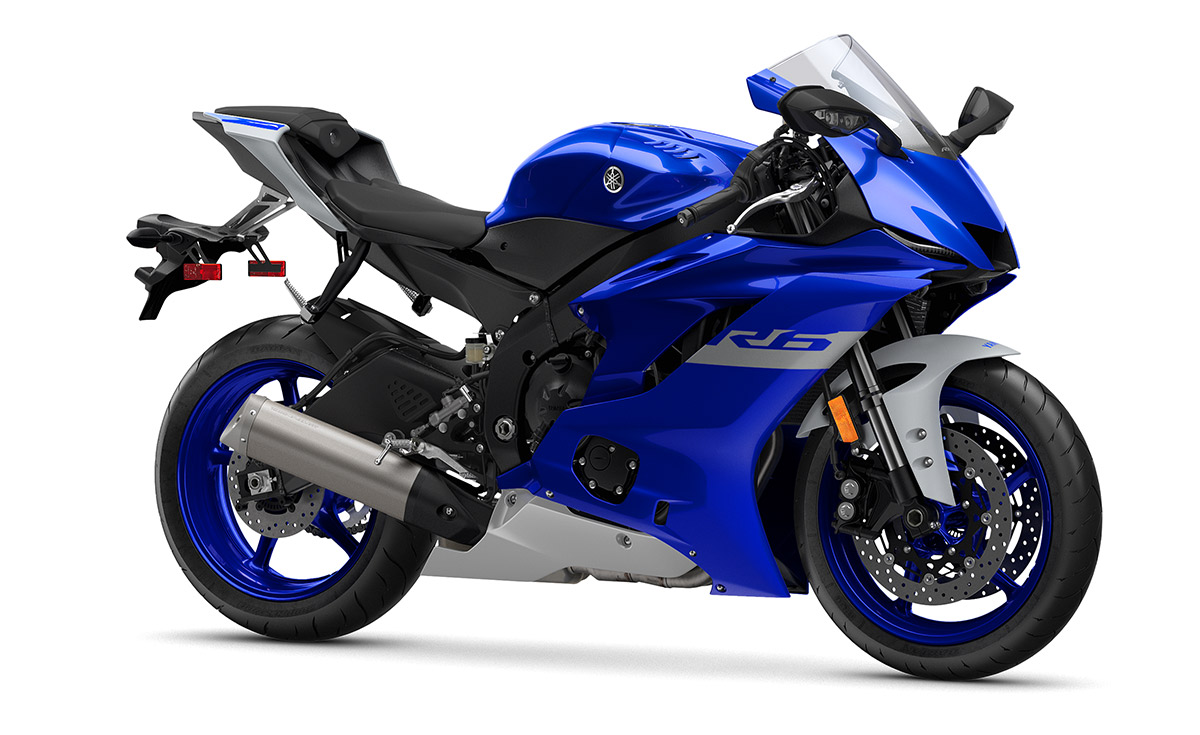

You can spot quite a few differences – tires, front & rear rotors, shock, forks, throttle, brake lever, master cylinder, bodywork, exhaust, wind screen, etc. For some reason race bikes like to put fake stickers where the headlights should be. You can look at the full list of changes on HSBK’s website.
Once a race bike, always a race bike
While technically possible, I would not plan on converting your race bike back into a street bike. Assume that whatever bike becomes your race bike, that it will spend the rest of it’s days on the track (what a lucky bike!). I recommend this for several reasons. First, you no longer have to keep all of the OEM street bits in boxes in your garage. You can often recoup some of the cost of building your race bike by selling these parts, especially sought after parts like fairings. Second, it means you have that much more peace of mind when modifying or working on the bike. There are some race bike hacks you can do that make your life easier when changing tires, brake pads, and other common race disposable parts. While awesome on a race bike, some of these hacks aren’t advisable for the street. Finally, consider the suspension and other track specific setup components that will make the bike UNBEARABLE (let alone unsafe) on the street. Your track suspension will feel like absolute garbage on public roads. At the end of the day, I think it’s much easier to assume the bike won’t see the street again. If you do decide to convert your race bike back into a street bike and plan to sell it, please make sure to disclose to any would-be buyer that it was in fact a race bike.
Choosing a bike size
Not all bikes are race-worthy! Make sure you are looking at bikes that are allowed to be raced in your local race organization. Some bikes do not have a class that they can be competitively raced in. For example there is not a competitive class for 750cc inline 4 motorcycles in my local racing organization. As a novice, you are also severely limited to which classes you can enter. For the Washington Motorcycle Road Racing Association (WMRRA), as a novice you are allowed into the sub-250, 250, 600 and 1000cc classes (but you are not allowed to race two different bikes in the same day). Generally organizations will require bikes that foster competitive, accessible racing. A 250, 300/400, 600 or 1000cc bike is a safe bet. Whatever you decide on, you should double check with your local organization’s rulebook or contact them directly about what classes novices are allowed to race in. Personally, I didn’t feel like I was ready for the litre bike madness just yet, but didn’t want my power to weight ratio be impacted as much with a 250. Thus, I went with the 600cc class for my first novice season (and will be racing 600 again for my second season). 600cc bikes also have the added benefit of being setup as a cripple triple if your race organization has it. Alex Taylor, the OMRRA Novice Rep makes adapters for the R6, and I’m hoping to convince him to make them for the GSXR as well. If I was to do it again, I would seriously look into starting on a 400 instead of a 600, as the learning curve isn’t as steep, yet they are still powerful enough to prepare you for riding a larger bike.
One last thing on choosing the right bike — I would recommend making sure the bike type you select has a good local scene. For example, by the end of the 2019 season, there were only 5 novices in the 1000cc class, but there were still 20+ racers in the 600 class. Racing is tons more fun when there are more people to compete with. While it might be counter-intuitive, the more racers out there the better. You will have more fun, and be more likely to run into someone just above your skill level that you can chase and learn from. If you are vying for sponsorship contingencies, sponsors usually require a minimum number of entrants to pay out for a race. A good way to find out what bike sizes are popular is to ask in the forums/facebook. Another way is to look at historic race results if your organization is using a race timer like Race Hero or speedhive (plus you can use these results to see how you stack up to the competition).
Step 2: Find a bike to buy
Alright! By now we’ve decided on a particular bike type, double checked the rulebook, and are ready to pull the trigger on buying something. We can either purchase a ready-to-race bike, or convert a street bike.
Consider buying an already prepped race bike
The easiest and cheapest way to make a bike race-worthy is to purchase one that is already good to go. There are many great deals on race bikes if you keep your eyes open, especially in the off-season. Sometimes racers aren’t able to race next year, or have already moved on to another setup. If someone has decided to take a break or get out of the sport, they often include extra parts and accessories in the sale. It is common to see race bikes for sale also include spare parts, stands, extra rims, tire warmers, and sometimes entire spare bikes!
Race bikes are usually well maintained
In general, I think race bikes are usually better maintained than street bikes, simply because they have to be in order to remain race-worthy. Most riders I know religiously change their oil and other wearable parts. Some change their oil after every track day (which may or may not be overkill depending on who you ask). Failing to maintain a race bike would have serious consequences, so racers are highly motivated to stay on top of things.
Where to find race bike deals
Race bike deals can be found in many places. I would start by looking at popular race forums like 13x.com, Craigslist or Facebook. More and more I am seeing this stuff show up on Facebook via the marketplace, racer groups, and race organization discussion pages. I really like Facebook because it forces you to put your face next to what you’re selling. That level of transparency gives me a lot more confidence.
Things to look out for when buying a race bike
I would definitely steer clear of a race or track bike that has 15k+ miles on the original motor. Corky Bell, the author of Maximum Boost states that every racing mile is equivalent to 1000 miles on the street. I think that is overdoing it a little bit, but you get the idea. Even if they are taken care of, race motors are put under such stress that they won’t last as long as they would on the street.
When buying a race/track bike make sure it isn’t stolen and is being passed as a “race bike” to hide that fact. If you want to perform a VIN check, most dealerships will look one up for you. I would be wary of bikes where the VIN is scratched off of the frame. That being said, a lot of race bikes don’t come with a title because of the resulting tax associated with street registration (which is not required for racing). A lot of race bikes are also bought for cheap from auctions after they have been crashed on the street. A bill of sale is usually sufficient for buying a race bike.
Comparing the cost of a race bike to prepping a street bike
Race bikes are often stupid good deals. When you compare the cost of an already prepped race bike to that of a street bike, the difference is astounding. Let’s look at a real world example:
Here is a bike from my local race group. The owner is asking $4,000 for his 2006 R6 and has stated their reason that they have already moved on to another bike. While this one is a particularly good deal, I see ads like this all the time (this one only took me 5 minutes to find by searching “sale” in the WMRRA [un-official] Facebook group). The bike is stated as having a Super Sport or ‘SS’ build, which means that some work has been done to it with the intention of competing in that class (though most organizations don’t have bike modification restrictions for novices). The ad states that it also comes with two new rear slick tires, extra body work, wheels and clip-ons… nice. It also appears to be running race fuel, which can get expensive so for the sake of comparison, let’s add another $500 bucks for the dyno time required to re-tune it back to pump gas.
In this case we have a ready-to-race bike with extra goodies for $4500. That’s a smokin’ good deal on a race bike.
The closest and cheapest bike I could find in my area was a 2006 R6 for $3400 with a salvaged title (not a problem for racing if everything is in order).
Let’s give both bikes the benefit of the doubt and assume they are up to date on all maintenance and everything is mechanically in order. To make this bike race legal, we would need to add the following parts at a minimum. I tried to find the cheapest bits that satisfy race requirements.
- Race Bodywork – $700
- GB Racing Case Savers – $232
- Zeta Lever Guard – $70
Just these three things alone puts us right at the $4400 dollar mark. This doesn’t take into account the other goodies already on the first bike like suspension, ECU and exhaust. In this example, I hope it is obvious that the already prepped race bike is a much better deal when you factor in the extra work required to make the street bike race-legal.
Buying and converting a street bike
Maybe you’d rather pick up a street bike so you can convert it and modify it exactly to your liking. I certainly can’t blame you, as I did exactly the same thing. While certainly the more difficult and time-intensive option, it can also be much more rewarding. It can be very satisfying building your bike from scratch, and I personally feel a lot more at ease knowing that I was the one who did the work.
Getting the same bike as your street bike
I ended up buying a street legal 2007 GSX-R600 for my first race bike. I specifically chose this bike because I found a good deal on one with a salvaged title, and I have been using an identical bike as my daily driver for the last 6 years. I thought to myself that at the very least I would have spare parts for the other bike at the end of the season.
Working on a bike you already know your way around certainly makes things a lot easier. It also means you’re more likely to have some of the tools specific for wrenching on it. For example, when working on my GSXR I already had an extra long screwdriver to get at the air filter clamp screws, and a swing arm castle nut tool made specifically for the bike. I also am already intimately familiar with the common failure points of the bike, so I know what spare parts to stock up on and how to diagnose issues that might come up. Ask me how many reg/recs I’ve gone through…
Getting a bike different than your street bike
If getting the same model as your street bike isn’t an option, or you’d just like to try something different, I would suggest going for something more popular and common so spare parts are easier to find. The most popular bike I’ve seen in the pits is the Yamaha R6, hands down. Having ridden a friend’s at a track day, I can certainly see why. They are very forgiving, with predictable and responsive controls. The parts are mostly interchangeable between the many years, aftermarket support is great, and there is no shortage of second-hand parts floating around. Anecdotally, I have seen more R6 and R6 parts for sale in my facebook groups than any other bike by a significant margin. If you’re looking at the lower displacement bikes, Ninja 250s are a good bet. For the 1000s I have heard good things about the Aprilia RSV4 and the Yamaha R1, but I do not have any personal experience to rely on here.
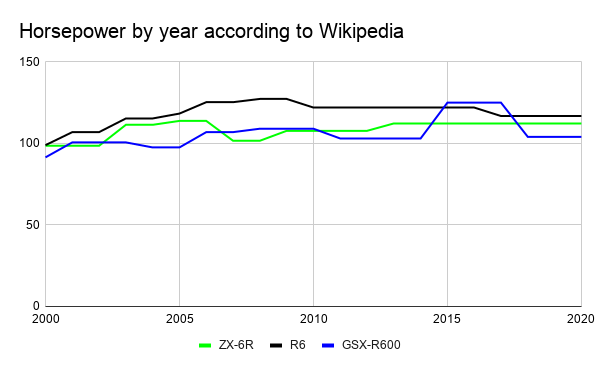
Does bike age matter?
I don’t think bike age is very important for the start of your race career. Generally anything within the last 15 years is going to be competitive at the novice level. One caveat here is the 1000cc class, as it seems manufacturers are making better and better litre bikes every year. If we look at the R6 wikipedia page, we see that the claimed HP since 2003 has remained relatively unchanged. The same thing goes for the GSX-R600 and ZX-6R. The age of the bike matters much less than the number of miles on the bike, and whether or not standard maintenance was performed throughout it’s life. While horsepower doesn’t tell the whole story, it is a good reference to drive the point home.
The cheaper the better
Think about how you would drive a $200,000 Lamborghini versus a $500 Honda Civic on the track. I would have no problem thrashing the Civic, but it would pain me to even put a scratch on the Lambo. The exact same thing goes for race bikes — the less money you have into yours, the less financial pressure you will feel when you’re on the track. This is a very, very good thing. Don’t go out and race something that you’re too scared to ride for fear of financial ruin. I like to consider my entire bike a write off that I will never see again, so that I can focus on racing and not worry about keeping the bike nice.
Final tips on buying a bike
Lastly, I would encourage you to educate yourself on the standard things to look for when buying a used motorcycle. I’m certainly not an expert here, but I am happy to refer you to some great resources who are:
- Revzilla – Tips for buying a used motorcycle
- FortNine – 5 Telltale signs of a bad used motorcycle
- Motorcycle Shippers – Buying a used motorcycle checklist
Step 3: Race Prep!
By now, you’ve found a great deal on a bike and purchased something that you’re ready to make race-worthy. Let’s start with the basics that you should do when buying any new motorcycle:
Maintenance first!
Unless you’re buying a brand new bike, you should perform all standard maintenance before moving on to upgrades. By riding a motorcycle, you’re putting your life at risk, and making sure the bike is up to date on it’s maintenance is a critical step to mitigating that risk. While doing maintenance you can also take the time to look over everything and discover any “modifications” the previous owner may have made. If you are not comfortable working on your own motorcycle, I would suggest working with a reputable shop and being prepared to empty your wallet. If you mention you are a racer, shops will often make you a deal or have a hidden discount if they are also active in the racing scene. For work that I can’t do myself (either due to skill or time), I take my bikes to Triumph of Seattle or 2 Wheel Dynoworks. Both shops do amazing work and stand behind what they do. They are also both active in the race community and have a presence in the race pits if you need follow up assistance.
If a $100+ hourly shop rate scares you, use this as an opportunity to get familiar with your new steed and do the work yourself.
Start with basic fluids; coolant (swap for distilled water), brake fluid, and oil + filter. I would also swap spark plugs, and air filter. Also check the suspension. If the seals are leaking at all or showing signs of age, replace the fluid and seals IMMEDIATELY. Usually when suspension components are neglected they tend to fail without warning, which is not a fun experience. Maintenance is also a great time to invest in some simple upgrades. A race air filter like a K&N or BMC would be a good upgrade over stock. You should also consider some upgraded brake pads. I prefer the EBC EPFA/GPFA pads, but have also heard great things about Galfer pads. I have a new set of Galfers on my bike that I will be trying at the start of the next season. Don’t forget to also check the chain, but don’t go out and buy a brand new OEM chain just yet. Chances are you’ll want to swap the chain/sprockets for something more competitive. More on that in another article.
Making it race legal
Now that we are up to date on our maintenance we can focus on making the bike race legal. I like to separate the requirements into three main categories: Safety Wire, Crash Protection, and Race Bodywork. The following information is not exhaustive, so please double check with your organization’s rulebook to make sure you got everything. Personally I recommend reading the entire race bike rules section, and making a checklist with something like Trello or a good ‘ole pen & paper as you go.
Safety Wire
Ah yes, safety wire. The reason it is called “safety” wire is because it acts as a secondary securing mechanism to keep the bolts from coming loose what with all the vibration that happens. I am still really bad at safety wiring (and my aerospace industry buddy who I race with let’s me know all the time). It is a right of passage for every racer to stab themselves with safety wire at least once during their first season. Make sure you practice a handful of times before actually doing it for real on your bike, or you will inevitably have to redo it when you fail your tech inspection.
Each bike has different safety wire requirements. Read your local rule book for the set of things that need to be wired on the bike. This isn’t always nicely worded, so I recommend reading over it a few times. As you read, make a checklist for how those rules specifically apply to your bike and setup. As an example, the WMRRA 2019 rulebook says in Section E.7: “All radiator caps drain plugs and petcocks must be safety wired.”. I don’t have a radiator drain plug or petcock on my GSX-R, but I do have a drain bolt right at the water pump housing. To account for this I would add “radiator cap” and “water pump bolt” to my list of safety wire spots. Once I’m done reading the rulebook, I am then left with a simple checklist of things to do, which is a lot easier to follow when I’m working in the garage because I don’t have to go back and re-read the rulebook. There are plenty of examples of how to safety wire stuff, so I will leave it to them to show you how to do it properly. If you aren’t comfortable drilling your own bolts, I would recommend Lightweight Racer titanium bolts. Titanium also holds up a lot better to abuse for frequently used places like calipers and axle pinch bolts.
This video helped me a lot when learning to safety wire:
Crash Protection
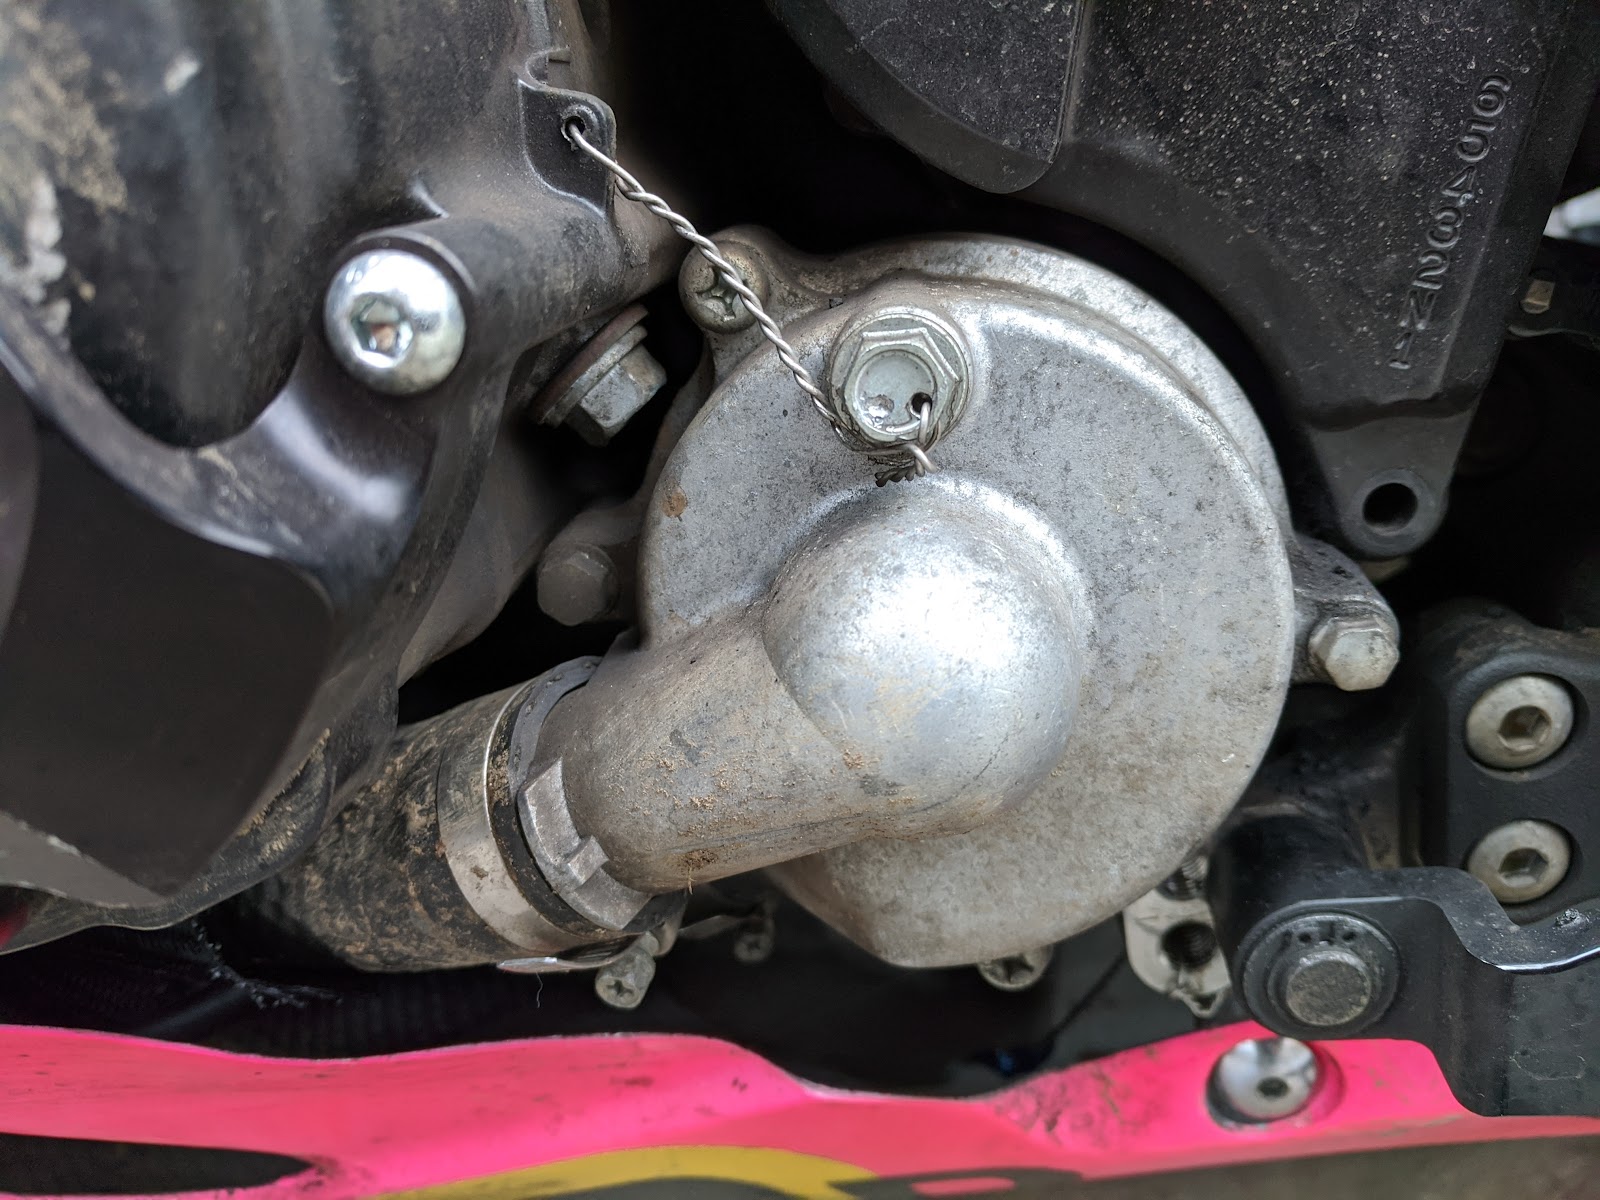
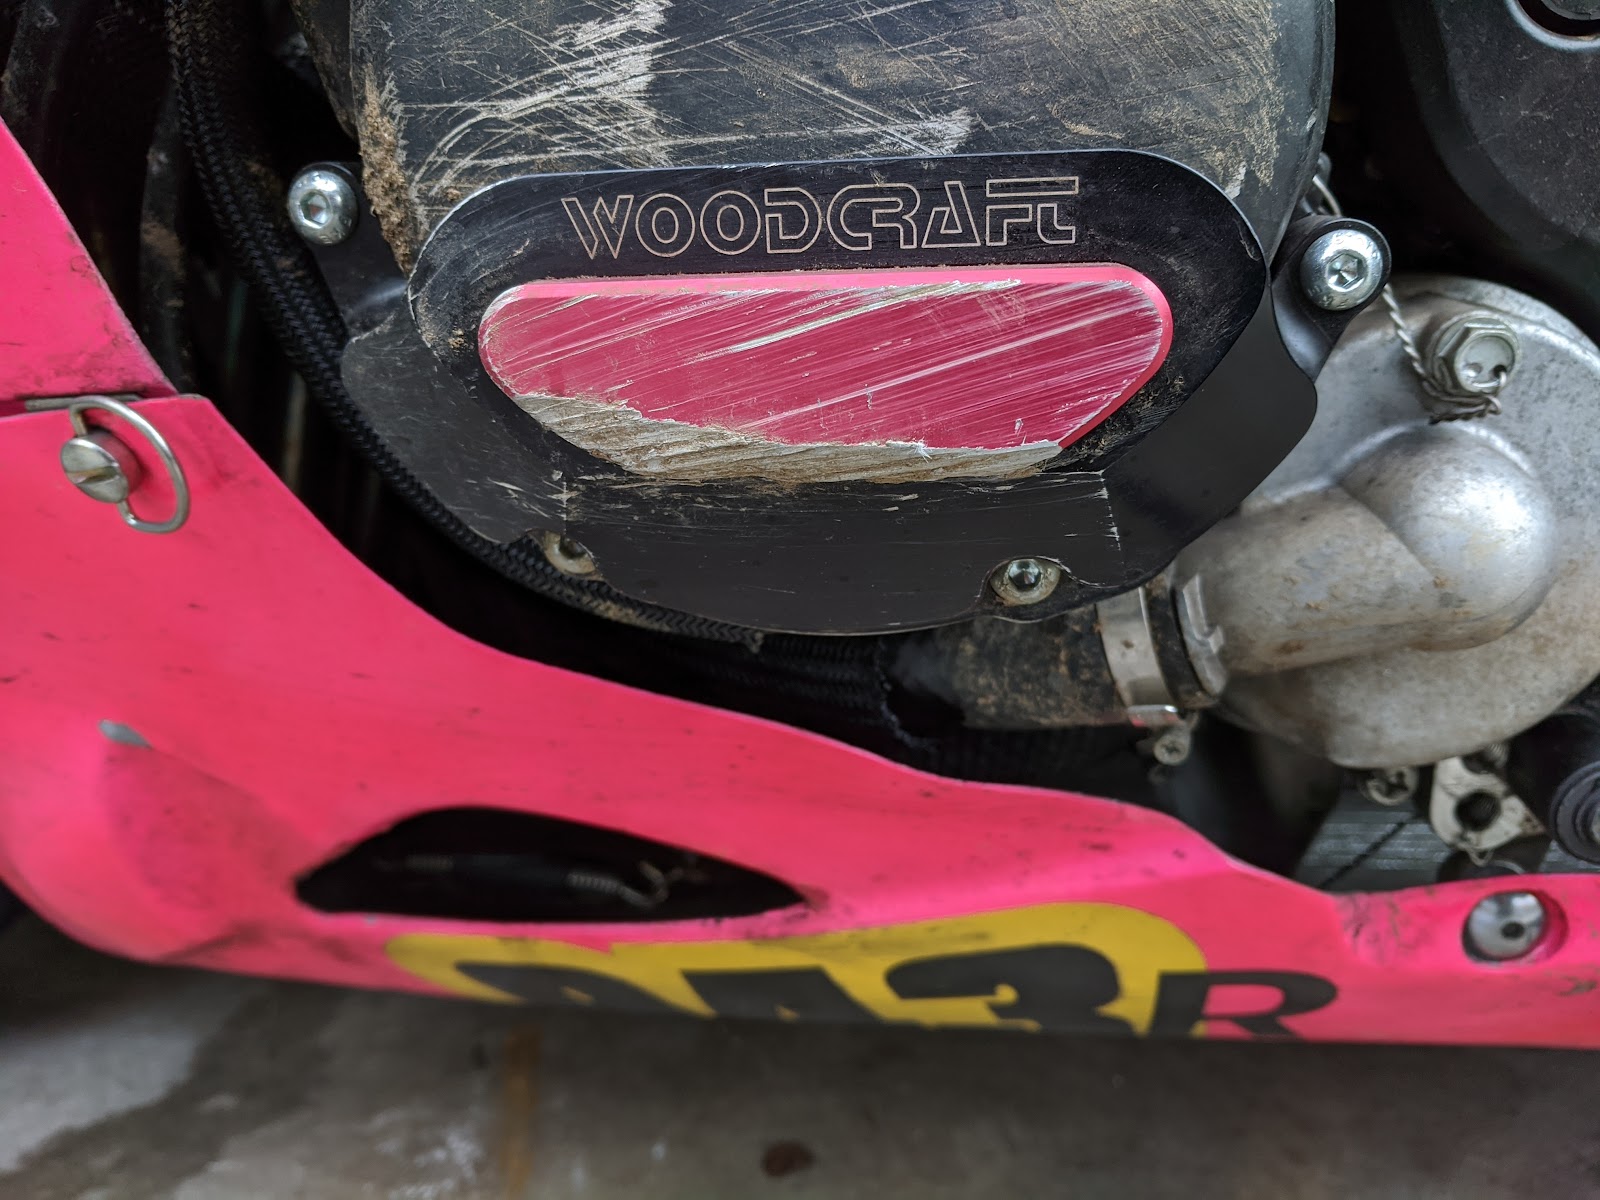
Nothing should be too alarming or unexpected here. You’ll need a brake guard to keep your brake lever from accidentally getting pressed and throwing you over the handlebars when you’re rubbing shoulders on the way to your first checkered flag. You’ll want frame sliders to help keep bits flying from your bike and hopefully reduce the damage caused in a slide. For me I use the Shogun sliders because they are cheap, easy to replace, and have held up pretty well for my handful of crashes last season. You’ll also likely need some case savers which prevent your crankcase from cracking and getting oil everywhere on the track. For my case savers I use the Woodcraft Case Covers, and they certainly do their job. I prefer the kind that sit on top of the crank case cover, rather than replace the cover entirely. That way it is easier to replace the slider without taking off the entire cover and needing a new gasket. More and more race organizations are also requiring a toe guard or “shark fin”. I use the GB racing one and my experience installing it was ok. I have seen some people just make one out of a spare piece of aluminum, but that seems a little too sketchy for me.
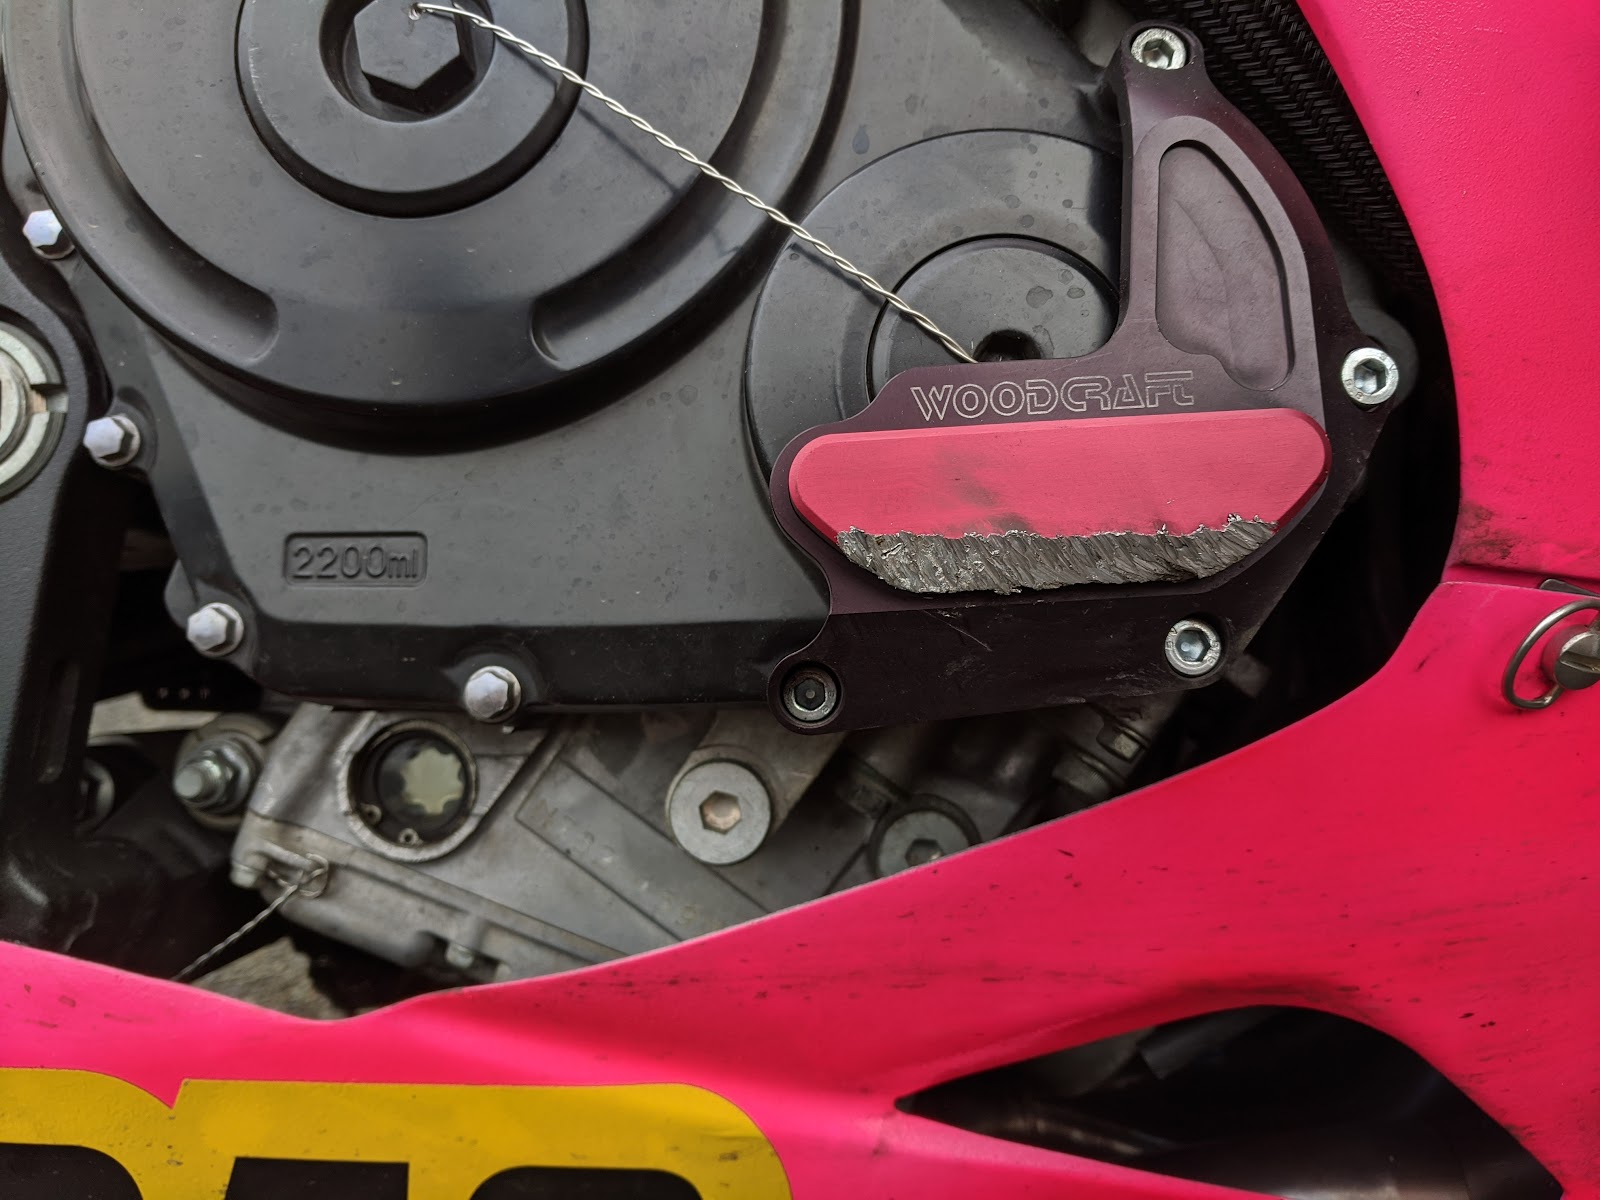
The Woodcraft case savers definitely get the job done.
Race Fairings
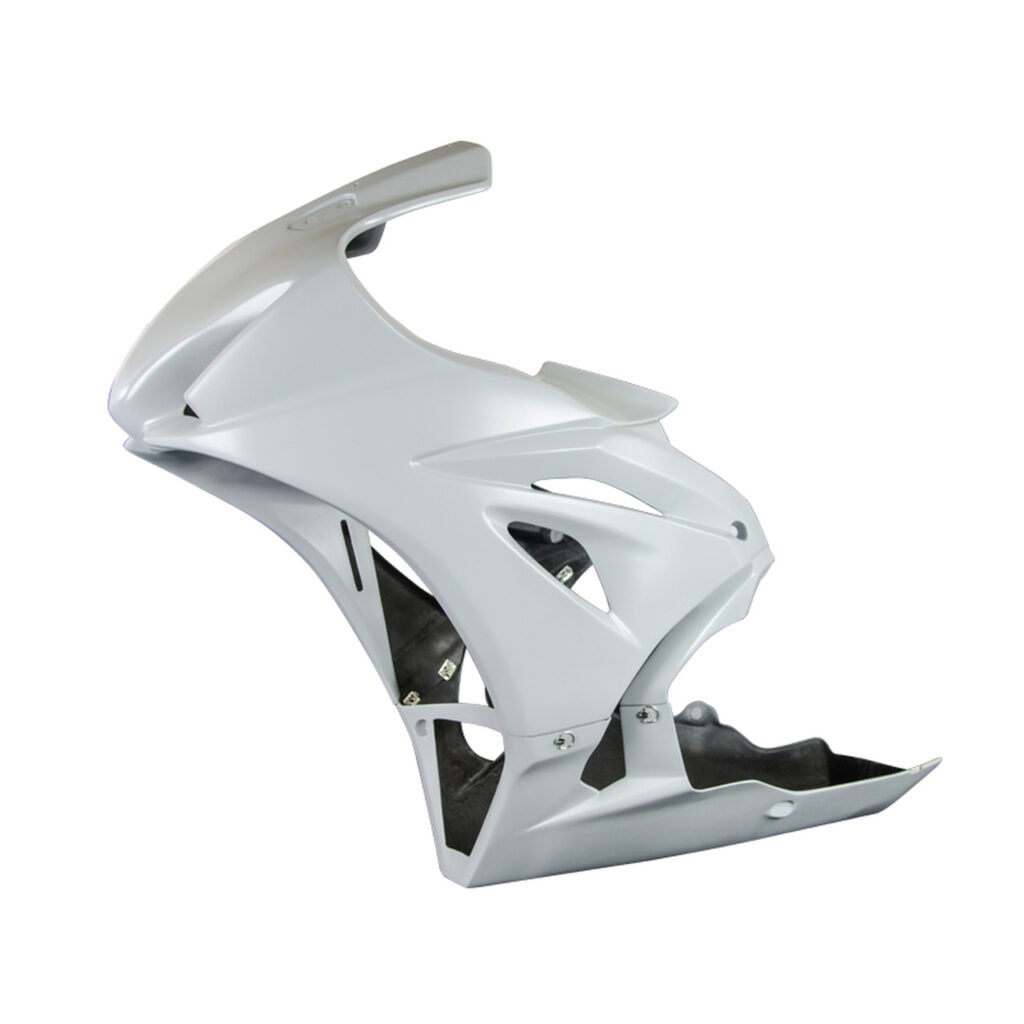
Race fairings are made of fiberglass or some other material that is designed to hold up way better than the OEM plastics. They also include a belly pan which is required for racing in order to prevent fluids spilling out of your bike making their way onto the track and causing a hazard for other racers.
From what I have seen, you have four options when it comes to race fairings here in the USA:
HotBodies – generally the cheapest, but I have heard they are a little wonky on fitment sometimes. I just ordered my first set when they had their annual 50% off sale, but I have not fitted them up yet. I will update this article when I finally get around to it. HotBodies also has the added benefit of weirding out your neighbors when you get a delivery of a giant box that says “HOT BODIES” with the silhouette of a naked woman on the side.
Armour Bodies – A little pricier than the HotBodies, but easier to fit up. I had no fitment issues with mine when I installed them. My fairings hit the pavement twice last season and they have held up just fine. They are also distributed by Woodcraft here in the USA, which is a company I have tremendous respect for.
Flexi-Glass – Unfortunately I don’t have a lot of experience with this brand. They are about the same price as the Armour Bodies. The WMRRA overall champion of this past season uses them so they must be good, right?
SharkSkinz – These are way more expensive than the rest. I saw the price tag and NOPE’d myself off the website. I honestly can’t speak to these, and since this is your first bike I would recommend springing for one of the cheaper sets. If you have experience with these please let me know and I am happy to update this.
Supersport vs Superbike Tail
This refers to the tail section, and whether or not you’d like to reuse the factory seat or replace it with a piece of foam.
Supersport = Factory Seat
Superbike = Fiberglass where the seat was, optional foam (sold separately) for comfort
Some people prefer the superbike because they claim it gives you more feel of when the rear tire is sliding. It also will modify the seat height (for better or worse), and one could also argue that it saves a little weight as well. I opted for supersport because I wanted to keep the factory seat and it makes getting to the battery easier. If you’re having trouble deciding, consider asking a rider at a track day if they wouldn’t mind letting you sit on their bike to get a feel for it. If you feel fine with the factory seat already I would recommend sticking with it and getting a Supersport. Don’t fix what isn’t broken.
Other Bodywork Details
Wind Screens – OEM windscreens are fine. If you are going to upgrade, I would NOT recommend getting a colored/tinted one, because you will want to be looking through it while you’re barreling down the front straight. A lot of racers use the “double bubble” style wind screens. I prefer Puig, but Zero Gravity works as well (though for my GSXR the ZG is not as optically accurate as the PUIG). Because I’m 6’4”, I have been meaning to try the ZG “Corsa”, which is larger than their Double Bubble and would make it easier for me to fit behind. I think ebay brand wind screens would also be ok, because really it’s just a piece of acrylic.
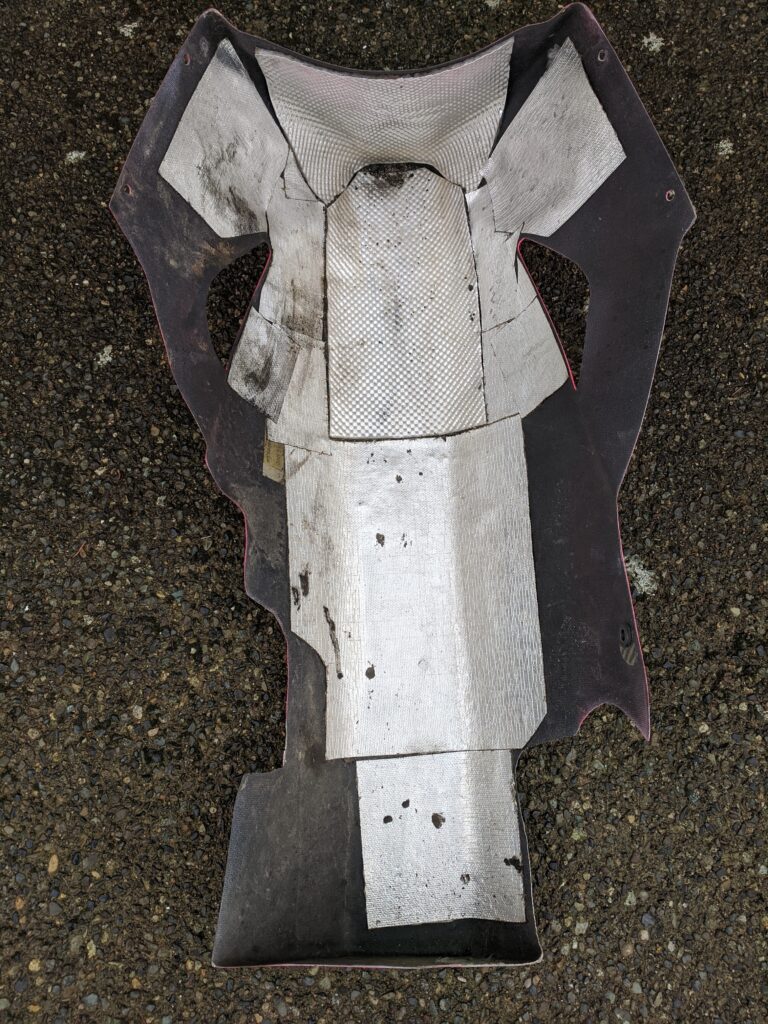
Heat shielding – I would recommend the Thermo-Tec Heat Shielding. I tried some of the heavier duty thick stuff but found it difficult to work with because it was hard to cut and bend, so I ended up scrapping it entirely in favor of Thermo-Tec. I used 2 rolls for one set of fairings.
EDIT 2023: Looking back, the heat shielding was probably overkill. You aren’t generating enough heat on a motorcycle without a catalytic system to justify the extra concern. It’s good piece of mind but most likely unnecessary. We don’t run any heat shielding on my MotoAmerica bike bellypan.
Fasteners – The reusable, quick release fasteners are so dope. The new style DZUS fasteners are great, and a strong improvement over the older design. I went with the friction-fit ones over the rivet style because I don’t own a rivet gun. Aside from the nice metal fasteners, make sure to keep some zip ties in your track bag if you need to do some emergency drift stitches.
Test Fitting – Make sure your fairings test fit nicely and pre-drill everything before moving on to paint. Finding out your fairings don’t fit AFTER getting that sick paint job would really suck.
Need a more practical example of installing race fairings? Brian Van with Sportbike Track Gear will show you how it’s done:
Paint
This one I would recommend leaving to the professionals, as I do not have the patience for it. Regardless, it doesn’t need to be perfect, but it should at least look good from 50 feet away at 50+ mph. You will be racing with this bike, so the paint will not stay perfect. I repeat, the paint will NOT stay perfect. Small bits of gravel at 100+mph will do some damage to even the most perfect of paint jobs. In my opinion, paint is not the place to spend extra money. Rattle-can jobs work well on the cheap, which is what I ended up doing. I used a fluorescent safety paint with some 2k Clear on top. In my opinion the 2k Clear was not worth the price per can for this application.
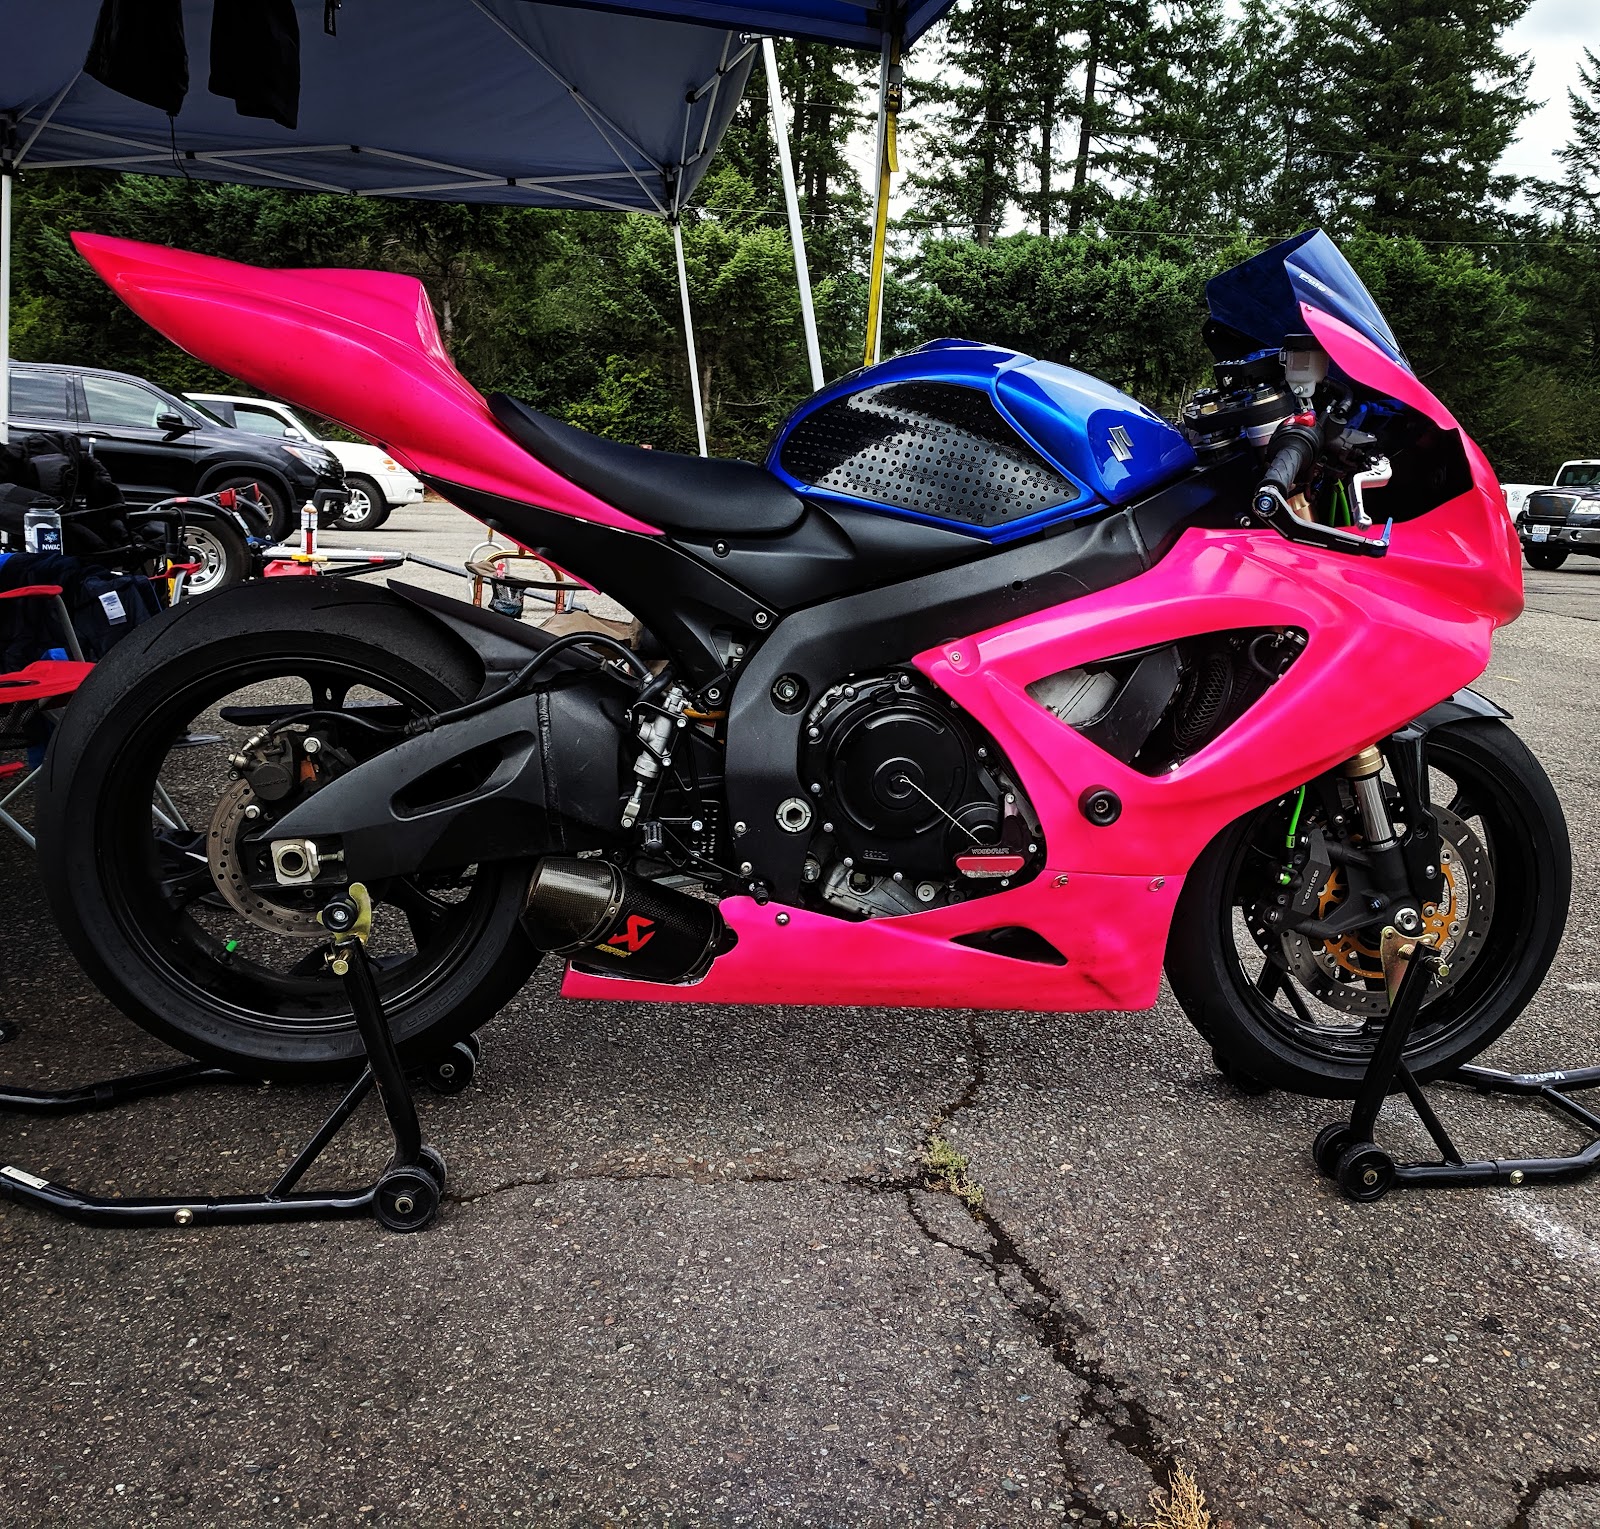
Here’s my paint at the start of the season…
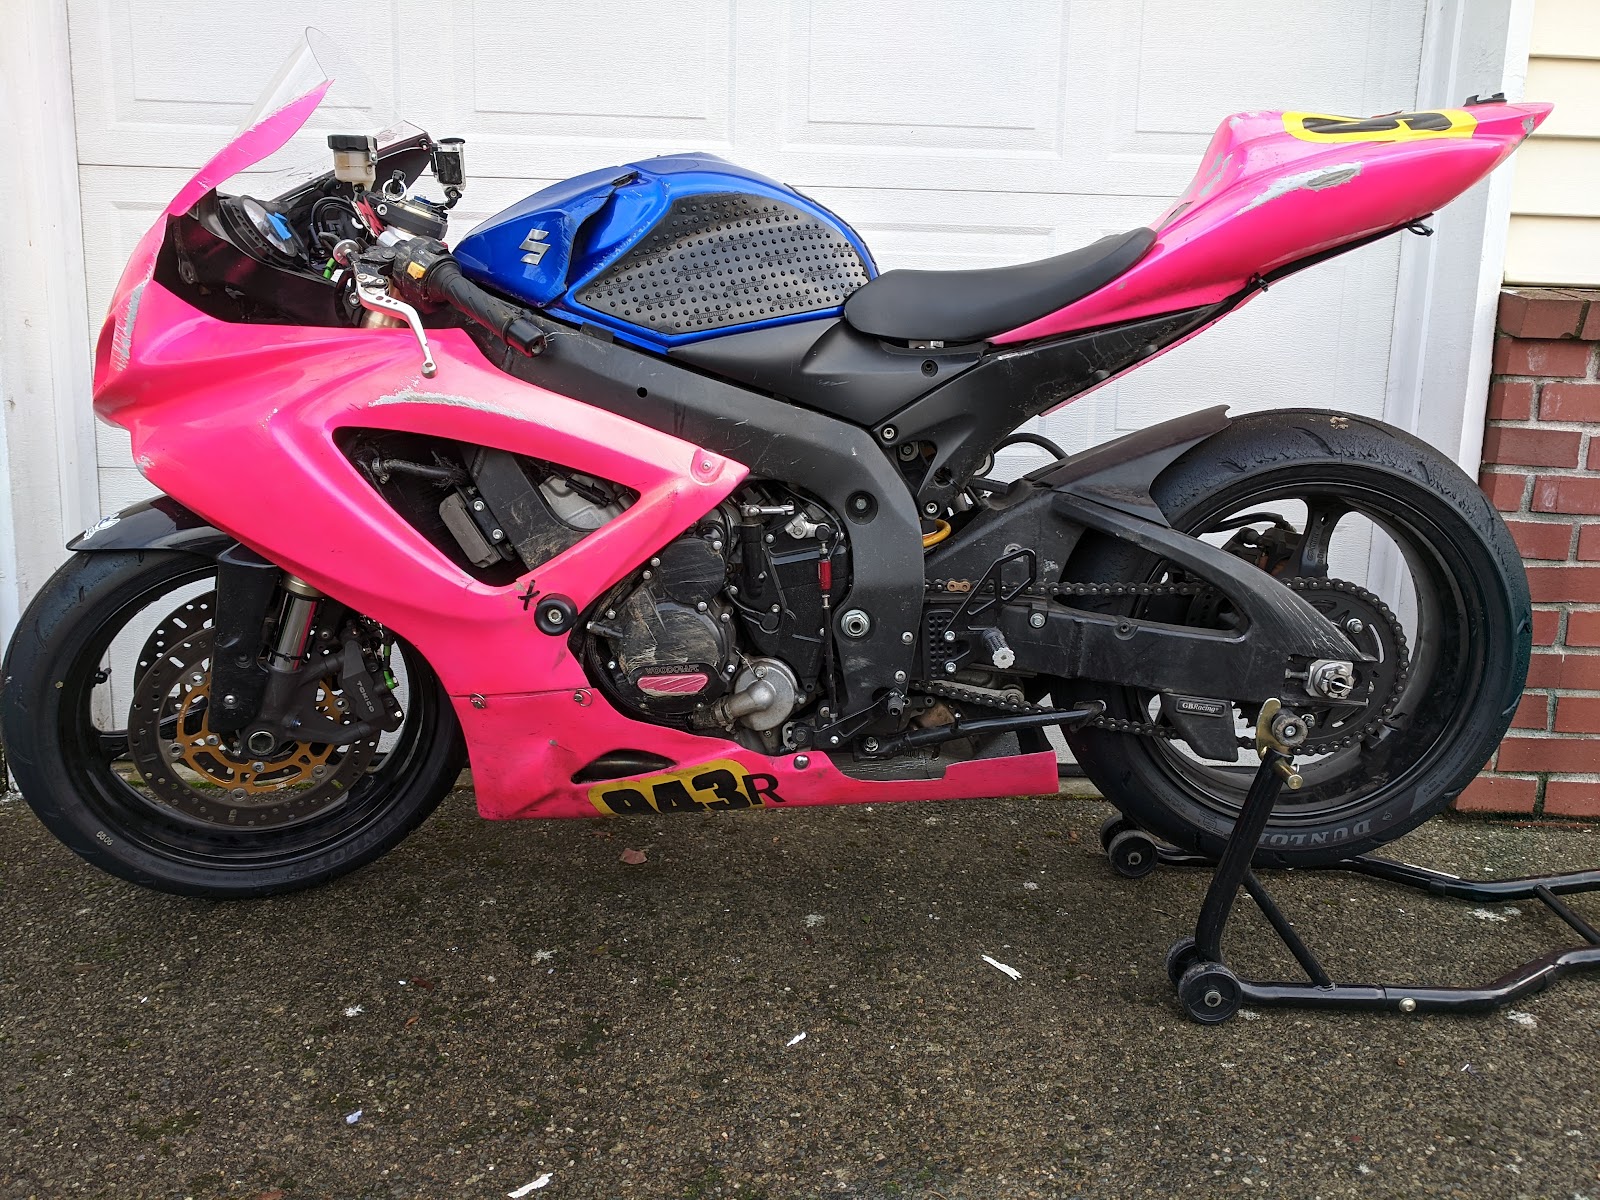
And again at the end of the season. Note the scratches on the side of the fairing, and the paint falling off behind the seat from rubbing against my rear end.
Ask around for paint supplies
Ask other racers if they have paint equipment you could borrow. For this coming race season some other racers and I plan to rent a paint booth to make the process easier, and one of us already has most of the paint gear from when they painted their previous bike two years ago. Splitting the overhead costs of painting makes it much more affordable.
One last thing on paint – most race fairings come with a nice coat of primer already on them. If you do plan on painting them, I would recommend painting them BEFORE you put any track time on them. Primer is porous by design, and is very difficult to re-prep if you decide to put some miles on them before painting. Some of my paint didn’t stick to my bike as a result of this.
Alternatively, use vinyl wrap
This one was recommended to me by local legend (and my race mentor) Mallory Dobbs. She uses vinyl wrap instead of paint, which has the added benefit of being easily fixed when you get too greedy and add too much throttle in the rain, thereby causing a lowside. Compared to repainting, it is a lot easier to just slap an extra piece of vinyl on your bike to hide your mistake …erm, learning experience.
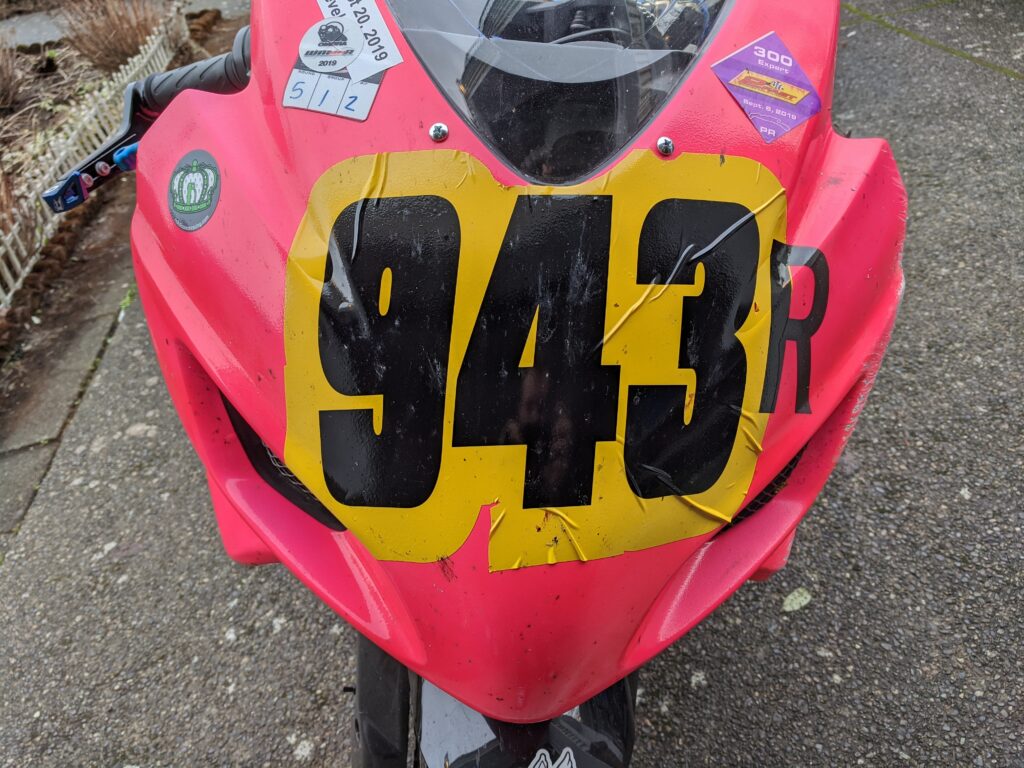
Race Numbers
Oh yeah, your bike also needs race numbers. There are requirements for color and size of numbers, and where they must be placed on your bike. Once again, be sure to check your rule book to confirm what the exact requirements are. Usually organizations require one on the front of your bike, one on each side, and either one large number on the tail, or two smaller ones on each side. There are lots of places to get your race numbers from. Some local vendors will make them for you, and there are also great websites. I haven’t personally used them, but PopShadow Decals looks like a good option. Pro tip from Kumpy Kump of Kump Racing Services on applying large decals on curved surfaces: cut little bits in the edges of the decal so they have some give when they go around a curved surface.
Here is my first attempt at applying race numbers. Please note that I put them on about 10 minutes before tech inspection, so I was feeling a bit rushed and didn’t take my time. I’m sure you can do a much better job than me. Please ignore the ‘R’. That was for marking me as a visiting racer at the last OMRRA race round.
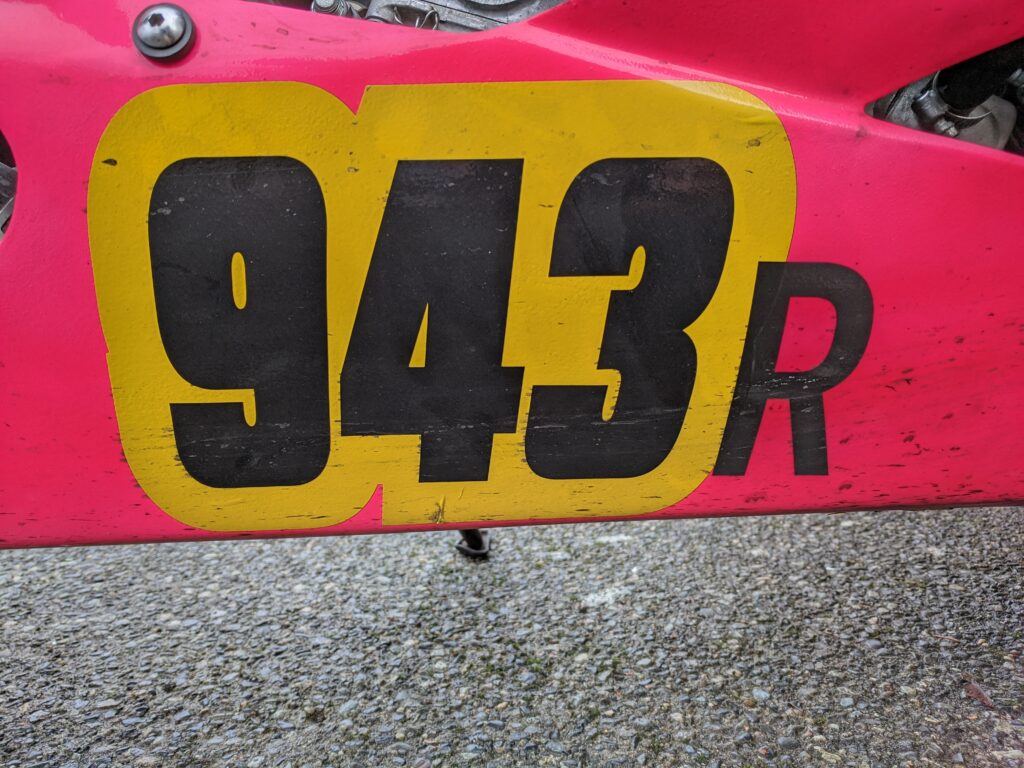
This next photo really shows the creases and bubbles as a result of applying this on a not-so-flat surface. I suck at applying race number decals. If you have tips or advice on how to do this better, or want to do it for me because you can’t stand looking at it please let me know.
Here are a few videos that might help you on your sticker journey.
Hinge Method:
Contoured surfaces
Closing thoughts
Wow, that’s a lot of information. I honestly didn’t expect to write that much when I started this article. It has really made me realize just how much I’ve learned in my first season as a novice. There’s a lot I would like to write about when it comes to racing, but I thought starting with how to build your first race bike would be a good start.
There is just something magical about racing motorcycles that I have yet to find anywhere else in the world.
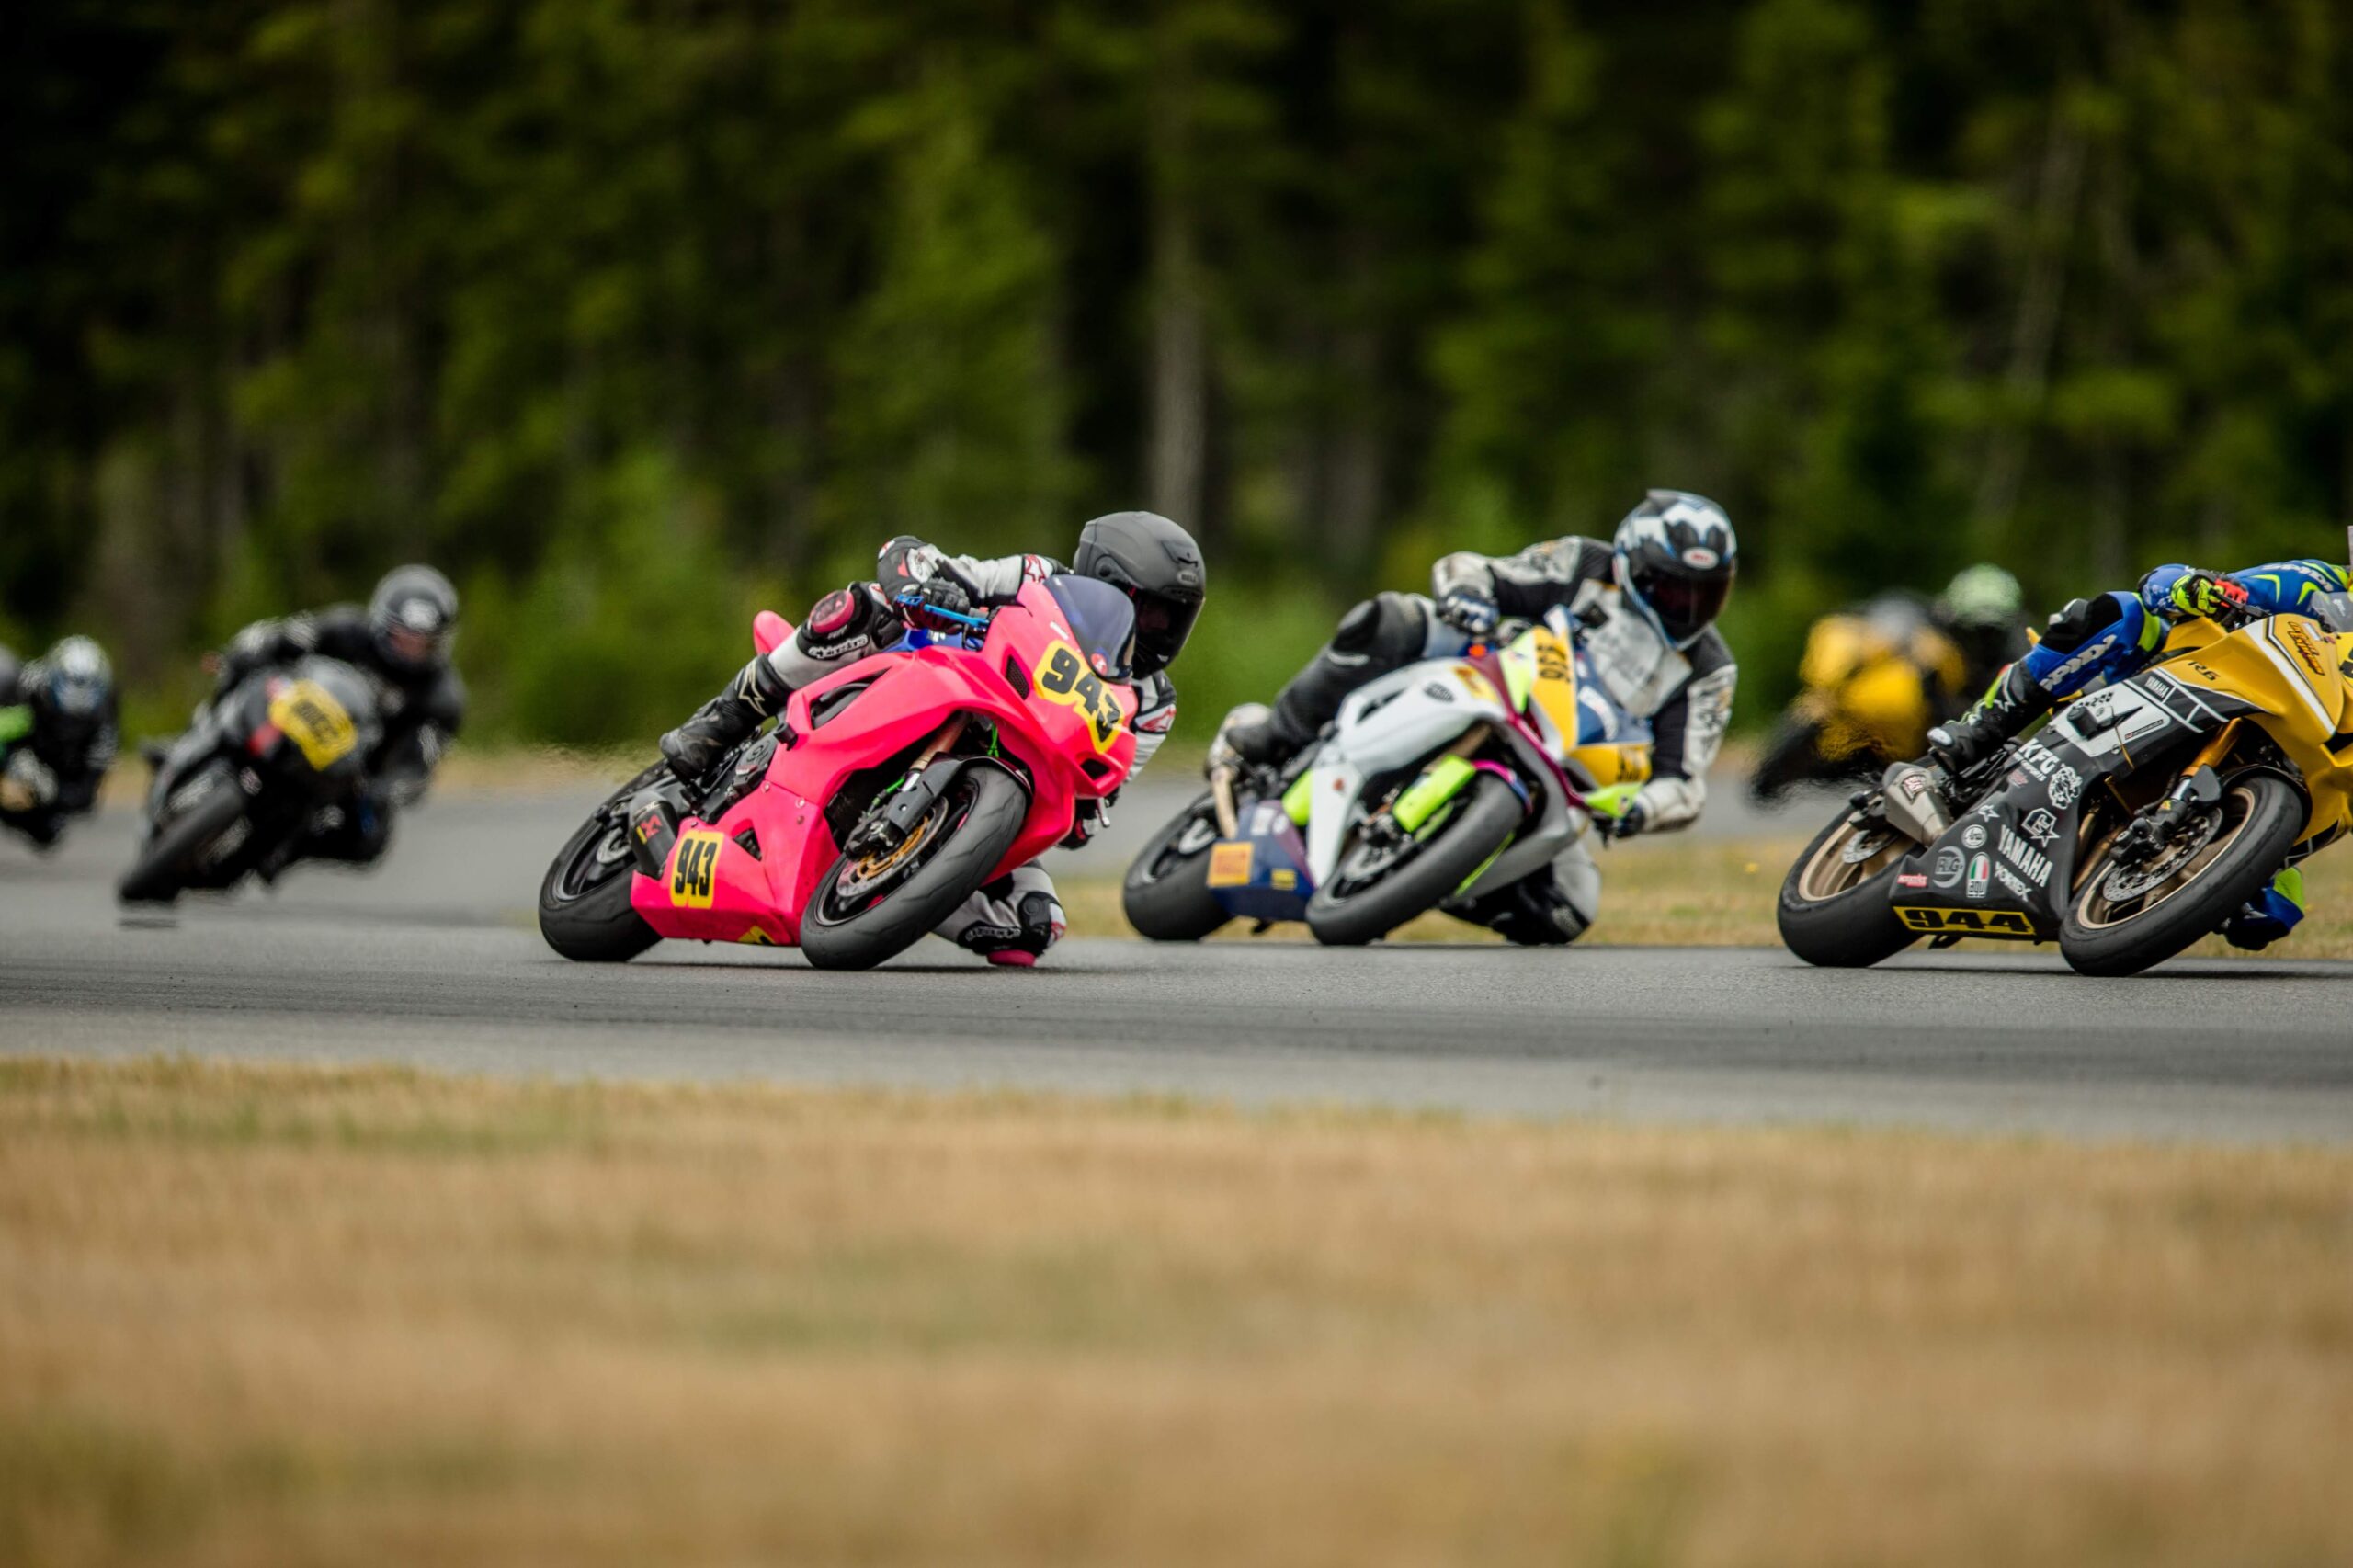
I hope this article was helpful! Let me know if you have any questions or if there’s any way I can help improve your racing. Feel free to email me at joel@opensource.racing, or look for the hot pink motorcycle in the pits.
Special thanks to Mallory Dobbs for editing this article!